Tuesday, 28 April 2009

imagine the music from benny hill

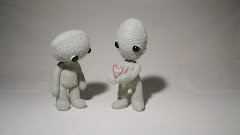
Here's my day distilled to 10 seconds. The backdrop needed rehanging after fixing the foamex sheets as support. Then it needed sticking down. The backlight was faulty and needed replacing...twice. My key light was sorted yesterday and my fill light needed a reflector so I used a peice of polystyrene attatched to a light stand...which proceeded to block this camera's view of the set.
I stuck down all the stands and cables and made a start on the film. 5 seconds so far.

Monday, 27 April 2009

backgrounds

So the idea I had for a background was a huge failure. I want something simple and plain that will allow the redness of the string to stand out. With the theme of the film being string I decided that using packaging materials for a background would tie in nicely. I had a massive piece of cardboard with a collage of bits of envelopes and brown parcel paper to use but when I put the puppets on it they looked wrong. The brown-ness was too much and too dark. The puppets ended up looking stuck on.
I had two other ideas. One was carpet (pic above), the other was a thick sheet of material (pic below). I think both worked ok, and the carpet had the added advantage of already having holes for tie-downs, but the material just looked better. It was lighter so the puppets stood out and it had no pattern so gave the illusion of infinite space, which is what I was hoping for.
I spent today setting up the studio, finding working lights and fighting with a huge sheet of material. I need something to support the curve as it leaves the wall and hits the floor. Foamex is being generously loaned to me but it'll have to wait untill tomorrow. Tonight I will be finishing off my rigs and hoping I won't have to use them much, 'cos I'll also have to learn how to paint them out in post production.
In other news, here is part of the test animation. In my mind the actual animation will be better, in reality I might have to rush it and it will all look like this.

Tuesday, 14 April 2009

storing zeds for future use

By now I hoped to have at least 15 seconds filmed.

I have 0 seconds.

I had the studio booked last week from Monday to Thursday, 10am-5pm, before uni shut for Easter, and I managed to film 10 seconds of test animation. Monday I was completely confident but I hadn't had the chance to test the puppets out fully before starting, so Monday was for doing that and setting up the lighting. Lights about 2 hours to do leaving me all afternoon for testing. I did about 12 frames before both of their heads fell off. The problem was that the polystyrene wasn't solid enough to support the glued in pieces of K&S, so as I turned the heads the polystyrene was breaking away. I went home about 3pm, optimistic about the next day when I would've fixed the heads and could start filming.

I unpicked the stitching of the necks and performed what felt like keyhole surgery on the heads. I used Milliput, an epoxy putty, to cement the K&S into the polystyrene and left it over night. In the morning I was pleased to find that it had worked, the heads turned well, but I decided to perform thorough tests before sewing the puppets back together.

I thought about putting them through extreme conditions just to make sure. Giving them to my dog to play with? Strapping them to the roof of my car (in a seated position) and doing a few miles on the motorway? Putting them in the tumble dryer (with a sheet of Bounce to mask the perfume smell while I'm at it)? As I thought about it I twisted and turned Righty's head which proceeded to come loose. That meant my Tuesday would not be spent filming but attempting to make the heads secure. In hindsight I should've left the Milliput longer to dry, the instructions say 24 hours to be completely dry, and I gave it about 16 hours. I did still believe that the Milliput would work so I spent the morning digging out polystyrene and squishing in Milliput.

They were done by noon so that I could give them 24 hours to dry and still have a few hours the next day to get animating. I was starting to feel less optimistic about what I could get done in a day and a half. This also tied in to the doubts I had about the background I was using. It wasn't working as I thought it would and it would have been difficult to match up for the next filming session in 2 weeks time. I decided it best to use the day and a half filming for testing, using a very simple background, to see how much I could get done in the time I had left and get an indication of how long the shoot would take. I would then work out how much sleep I would be losing and start storing it up in preparation.
So this is how I ended Wednesday. I managed 3 seconds in 4 hours. The heads were functioning well. Problems were with tie downs. I had magnets which I tried first, just because they saved a little time and also meant less post-production without holes in the set. I think the wool was too thick for them to function properly and the feet tended to swivel too much. So I switched to threaded rods, which worked great but were hard to fix to the feet through the wool soles.

The idea of moving the eyes around the face was working. I was using plasticine to make eyelids when I needed them but it left a residue on the enamel of the eye and so they became less shiny. I'm going to see about making replacement eyes if the shop has enough of the buttons left. If not I'll try making replacement eyelids. Putting screws on the back made the eyes quite secure but when I unscrewed them the screws caught in the wool and pulled it a bit. I'm considering switching to pins or small nails instead.
Thursday I managed 7 seconds. It wasn't great animation but I got a feel for the limitations of the puppets. One of Lefty's hips became loose and refused to tighten, which is why she has all her weight on one hip in the picture above. Righty's head became loose again too so he'll need another operation soon. Other than that it was great to get in to a studio again and just get lost in animating. I look forward to starting properly in 2 weeks.

For the testing I averaged 1 second of animation an hour so it follows that I'll be able to shoot the film in 90 hours. However, once the string shows up each frame will take longer and I want to have better quality performance than achieved in the test so I'll double that to 180 hours. That's 1 frame every 5 minutes which is plenty as I'm working on 2's (2 frames for 1 picture), so it's really 10 minutes per movement. I have the studio booked for 18 days, including the weekends so that's 10 hours of animation per day, which is quite reasonable and doesn't cost me any sleep.

But, I left booking the studio until the last minute so officially I have 8 days before the project deadline, which works out to 22.5 hours animating per day and 1.5 hours sleep. That would involve storing 48 hours worth of zzZZs over the next 2 weeks.

Hmm...the film won't be finished for the deadline but it will definitely be finished before my studio time runs out. Who'd have thought maths could be comforting?

Tuesday, 7 April 2009

big, beady eyes

Finding eyes for the puppets has been a difficult search. Given that they're made from wool it would be logical to use big buttons for eyes. At any other time they would be perfect but with the release of Coraline imminent I think it best to stay away from anything buttony. I have hunted through bead shops, charity shops, markets (normal and super), diy shops, craft shops, toy shops and virtual shops. I'm sick of shops. I even checked peoples' clothing as they passed me on the street just in case I saw the perfect eyes. I don't know what I would've done if I'd found someone with the right buttons on their coat...stalked them I suppose in the hope of gathering enough evidence on their shopping habits to determine where the coat may have come from. Asking them would have been easier but I'm quite shy, plus the chance to be a spy for the day and tail a perp is too much fun to ruin by being direct.

After finding many potential eyes, most of which were smaller than I wanted but would've worked, I finally found two possibles of the right size and shape I had been seeking. Typically they were both in the same shop.
One is flat and plastic the other is rounded and metal. You can sort of see me and my living room in the metal one. Hiya. I thought the flat ones would be the more successful so I tried them first.
The roundness of the head makes them look oval straight on and in profile. I liked them but they still felt a bit too buttonish, so I primed and sprayed the metal ones to see how they looked.
I'm really pleased with them. This is Lefty finished (apart from eyelids) and I think the way the eyes catch the light helps make her look more alive. It'll be even better in the studio. I think the shape will lend itself well to the different eyelids and so help express emotion. I've attached small screws to the back of the eyes to fix them to the head, but also so that I could move them around. The eyes have no pupils so for the puppet to look around the head will have to move instead. I'm going to test the idea of moving the eyes around the face when they look around and I'm hoping it'll look cartoony and save too much head nodding.

I'm fairly happy with the finished puppets. They have larger shoulders than I planned but with the thickness of the skin it was difficult to make them much thinner. I don't get as much control over the hands as I'd hoped but the important movement is the grip and they can do that fine.

Thursday, 2 April 2009

master of puppets

So begins my attempt at model making. Having never made a puppet I have no idea if what I'm doing is right or wrong, but I'm learning and that's what's important. The armatures are kits bought from animationsupplies.net, which come with helpful instructions. I've drawn up the armature to scale as a guide. On the drawing the head and pelvis are too small and the legs a little too long so I rectified this when cutting the threaded rod.
I spent a good few hours hacksawing at the rod before deciding that the junior hacksaw I had was managing to hack but not saw. With an aching arm and sore fingers I ventured out to my nearest hardware store to buy some sort of power tool so save me from the pain, cursing myself for being a weedy girl. However, when I got to the sawing aisle I decided to be a man about it and replace my clearly faulty tool with something big and shiny... a more expensive hacksaw. My new saw cut through the 2mm rod like a hot knife through butter, well, if the knife was blunt and the butter already on a particularly stale crumpet. Anyway, it worked much better and I finished cutting the rods without much arm ache.
The rods needed filing so that the threaded balls and fixing components could be glued in place. I left them to dry overnight to make sure they were as solid as possible.
Success! After screwing the plates together I found that it stands and supports it's own weight. I was worried that the feet were too small to balance the frame, especially with the size of the head. I glued a peice of K&S to the neck section to attach the head. I also bent a picture hook and glued it to the chest peice (not shown in picture above) ready to hook the string on to during filming.
Using upholstery foam I snipped a body shape, leaving access to the joints for tightening. The hands are made from a sheet of pewter which is strong but gives a fluid movement. They look a bit like shovels but hopefully they'll work.
The next step was the skin. I bought a cardigan in a sale that still stinks of someone's sickly perfume. Maybe I should''ve bothered to wash it first. It is a close match to the square I made but is thicker and so has larger holes, which are easier to get a screwdriver through for joint tightening. I used wadding to fill it out a bit and snipped some more foam for the feet. I have to admit that this part is mostly the work of my mum. I had used a sewing machine before, but I was 11 and making a baby's picture book in Home Econmics. I'm not sure why, I didn't really know any babies to give it to. So my mum stepped in as chief sewing machinist. I stuck to the hand stitching to finish it off, which I have done since I was 11.
The heads are made from hollow polystyrene eggs. Righty's head just needed the top sanding off but Lefty's needed a bit more sculpting to make it oval.
Above is Lefty's head after being sanded and covered. Even though it's big it's very light so shouldn't cause any problems to the armature's balance.

Thursday, 26 March 2009

string squares and huge heads

Here's some concept art for how Lefty will look. I've purposefully designed these characters without thinking about armatures. I don't want the thought of how it will work to get in the way of how they should look. Their shape is fine in 2D, the challenge will be to create the armature to make the 3D shape as similar as possible.
There are two main problems with this design. The first is the size of the head. She looks really cute but the actual puppets will need a smaller heads to be able to interact. I want them to be able to hug each other in a realistic way and not have their contact restricted by their bubble heads. The second is the thickness of the arms and legs. The size of the ball joints will dictate how thin they can be but I will try to keep the aesthetic of this concept design as best I can.

The plan is to have a knitted skin for the puppet around a ball and socket type armature that is stuffed with wadding. I'll flesh out the shape with polystyrene but I want them to look like little sack people. They need to look like they have weight while standing still, hence the volume being around the belly, the hands and the feet. To discover what knitted string looked like I made this...
It was my first attempt at knitting and all those Hollywood actresses are right, I found it very addictive. Part of me thought I should've attempted something a little more useful than a square but I was happy to hear my Nan say that they used to knit dishcloths out of string and sell them at fates. I don't think mine would fetch much though. Anyway, the point was to find out how string moved when it was knitted. Surprisingly it seems like a good material to use for a puppet. It has enough stretch to enable movement and is tensile enough to keep the puppet's shape. Even though I would love to knit Lefty and Righty myself, it's just not practical. The reject dishcloth took me a whole day to do and I'd have to learn how to knit more than just squares, so the idea now is to find a ready made knitted garment that I can cut up and stitch together.

Tuesday, 10 March 2009

start at the beginning...

These are the doodles of the initial idea. Two characters meet, fall in love and become connected by a length of string.
The film follows the breakdown of the relationship as each character fights for control and ownership of the string. In this early stage the puppets were going to have big holes in their chests that would become full of red string when they met each other, but when I pitched this idea my tutor James suggested that the puppets could be made entirely of string. I liked this idea as it made sense that they would be giving part of themselves to one another.
The character concepts are inspired by Morph, voodoo dolls and Sad Sack from The Raggy Dolls. The puppets are simple but hopefully expressive. The film will be all mime based performance so no mouths are needed. They are designed so that the same armature could be used and each puppet filmed seperately to bring down costs.
I've named them Lefty and Righty because for most of the film they will occupy the left and right side of the screen respectively. They are genderless because the aim is to show which is male and which female through the performance. However, I have given them different shaped heads with their gender in mind.