Thursday, 2 April 2009

master of puppets

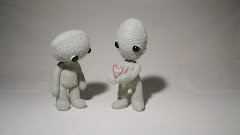
So begins my attempt at model making. Having never made a puppet I have no idea if what I'm doing is right or wrong, but I'm learning and that's what's important. The armatures are kits bought from animationsupplies.net, which come with helpful instructions. I've drawn up the armature to scale as a guide. On the drawing the head and pelvis are too small and the legs a little too long so I rectified this when cutting the threaded rod.
I spent a good few hours hacksawing at the rod before deciding that the junior hacksaw I had was managing to hack but not saw. With an aching arm and sore fingers I ventured out to my nearest hardware store to buy some sort of power tool so save me from the pain, cursing myself for being a weedy girl. However, when I got to the sawing aisle I decided to be a man about it and replace my clearly faulty tool with something big and shiny... a more expensive hacksaw. My new saw cut through the 2mm rod like a hot knife through butter, well, if the knife was blunt and the butter already on a particularly stale crumpet. Anyway, it worked much better and I finished cutting the rods without much arm ache.
The rods needed filing so that the threaded balls and fixing components could be glued in place. I left them to dry overnight to make sure they were as solid as possible.
Success! After screwing the plates together I found that it stands and supports it's own weight. I was worried that the feet were too small to balance the frame, especially with the size of the head. I glued a peice of K&S to the neck section to attach the head. I also bent a picture hook and glued it to the chest peice (not shown in picture above) ready to hook the string on to during filming.
Using upholstery foam I snipped a body shape, leaving access to the joints for tightening. The hands are made from a sheet of pewter which is strong but gives a fluid movement. They look a bit like shovels but hopefully they'll work.
The next step was the skin. I bought a cardigan in a sale that still stinks of someone's sickly perfume. Maybe I should''ve bothered to wash it first. It is a close match to the square I made but is thicker and so has larger holes, which are easier to get a screwdriver through for joint tightening. I used wadding to fill it out a bit and snipped some more foam for the feet. I have to admit that this part is mostly the work of my mum. I had used a sewing machine before, but I was 11 and making a baby's picture book in Home Econmics. I'm not sure why, I didn't really know any babies to give it to. So my mum stepped in as chief sewing machinist. I stuck to the hand stitching to finish it off, which I have done since I was 11.
The heads are made from hollow polystyrene eggs. Righty's head just needed the top sanding off but Lefty's needed a bit more sculpting to make it oval.
Above is Lefty's head after being sanded and covered. Even though it's big it's very light so shouldn't cause any problems to the armature's balance.

Thursday, 26 March 2009

string squares and huge heads

Here's some concept art for how Lefty will look. I've purposefully designed these characters without thinking about armatures. I don't want the thought of how it will work to get in the way of how they should look. Their shape is fine in 2D, the challenge will be to create the armature to make the 3D shape as similar as possible.
There are two main problems with this design. The first is the size of the head. She looks really cute but the actual puppets will need a smaller heads to be able to interact. I want them to be able to hug each other in a realistic way and not have their contact restricted by their bubble heads. The second is the thickness of the arms and legs. The size of the ball joints will dictate how thin they can be but I will try to keep the aesthetic of this concept design as best I can.

The plan is to have a knitted skin for the puppet around a ball and socket type armature that is stuffed with wadding. I'll flesh out the shape with polystyrene but I want them to look like little sack people. They need to look like they have weight while standing still, hence the volume being around the belly, the hands and the feet. To discover what knitted string looked like I made this...
It was my first attempt at knitting and all those Hollywood actresses are right, I found it very addictive. Part of me thought I should've attempted something a little more useful than a square but I was happy to hear my Nan say that they used to knit dishcloths out of string and sell them at fates. I don't think mine would fetch much though. Anyway, the point was to find out how string moved when it was knitted. Surprisingly it seems like a good material to use for a puppet. It has enough stretch to enable movement and is tensile enough to keep the puppet's shape. Even though I would love to knit Lefty and Righty myself, it's just not practical. The reject dishcloth took me a whole day to do and I'd have to learn how to knit more than just squares, so the idea now is to find a ready made knitted garment that I can cut up and stitch together.

Tuesday, 10 March 2009

start at the beginning...

These are the doodles of the initial idea. Two characters meet, fall in love and become connected by a length of string.
The film follows the breakdown of the relationship as each character fights for control and ownership of the string. In this early stage the puppets were going to have big holes in their chests that would become full of red string when they met each other, but when I pitched this idea my tutor James suggested that the puppets could be made entirely of string. I liked this idea as it made sense that they would be giving part of themselves to one another.
The character concepts are inspired by Morph, voodoo dolls and Sad Sack from The Raggy Dolls. The puppets are simple but hopefully expressive. The film will be all mime based performance so no mouths are needed. They are designed so that the same armature could be used and each puppet filmed seperately to bring down costs.
I've named them Lefty and Righty because for most of the film they will occupy the left and right side of the screen respectively. They are genderless because the aim is to show which is male and which female through the performance. However, I have given them different shaped heads with their gender in mind.